Showing posts with label Pinterest. Show all posts

Thursday, October 13, 2016

I Am No Stylist... Clothes, Hair or Otherwise

I need Blog Worlds help...

I am not into fashion anything. I don't dress in the latest styles, I don't do my hair any different then I have for like the past 10 years, I am not into makeup... I was raised with three younger brothers and I am now raising three boys. I never was that girlie girl and with all these boys I probably never will be. This is where I struggle... in November we are getting our family picture taken for the church directory and I don't know what we should all wear. I want us to match but not like perfect matchy-matchy where we are all wearing jeans and white shirts. I want a little color but simple and stylish.

I googled/pinterested ideas and then remembered I purchased a jean dress back in April-ish. It was too small back then and was supposed to take it back... but never did. Now I have this dress that I need to wear. I know I said it was too small in April HOWEVER with his journey that I am on by November I will actually be smaller, by 10 pounds, than what I was in April so it should fit. As I did some research I found you shouldn't really wear statement jewelry but maybe a cute scarf so I thought I would go that route. I hopped on target.com and found a ton of scarves and then settled on one. From there I found clothes for all my boys... well except Oliver but I ran to Target yesterday and they actually carry the sweater I had in mind. 

This is where I need your opinion....

Obviously I am the dress and scarf. I would wear some ivory tights and my black knee boots. Tim would be jeans, gray shirt and black shoes. Carter jeans with a lavender t-shirt under a black pull over sweater that has a small zipper to show the peak of color. Oliver would be jeans, ivory sweater and maybe a colored shirt underneath. Finally, Evan would be the mustard yellow outfit above. 

The question is did I pull it together or should I start all over? I feel I never get this right. 

Wednesday, May 28, 2014

Camping Arts & Crafts

As you have read we went camping with my family this weekend at my family clubhouse. When we all get together there are anywhere between 7 to 10(+) kids there. There is a lot for them to do but after a few days they get bored. I know my Aunts brings things for the kids to do so I thought this time I would bring the arts and crafts. I wanted to keep with nature and recycling so I started my search and it didn't take long until I found the perfect craft.

My go to place is Pinterst.com which is where I found the instructions for a butterfly feeder, you can get to the instructions here. As I read the instructions they sounded pretty easy. I had jars from the dried beef I bought to make pickle roll-ups, I ran to WallyWorld for foam flower stickers and letters, string, and sponges. 
Before the lids were stuffed with sponge and put together

What I didn't think out was the fact that there were ten kids making these feeders and I would be the one putting the hole in the lids and I would be the one putting the string on them. Luckily my Aunt Judy (also teacher) was there to help me. The kids were all excited to make their feeders, they all turned out awesome and I know my kid can't wait to make the nectar to fill the jar (I included the recipe on the inside of the feeder).
Here are a few of the finished jars. They 
will hang by a string upside down so the 
nectar will get to the sponge.

We also made nature dragonflies. I can't take the credit for coming up with these, I owe it all to Mary Jean (my brothers girlfriends mom- you follow that?). She watches my niece during the week and is always doing fun crafty things. She made this one and it was perfect for a cheap project.


What you need:

hot glue
straight, thin stick from yard
4 helicopter seeds from yard
paint brush
paint

You glue the 4 seeds about an inch from the top of the stick. Once the glue has set give it to the child to paint however they want. We used glow in the dark acrylic paint. Once it is painted you can add antennas to the dragonfly by using two this short leaf stems and hot gluing them to the top of your fly.


All the crafts turned out super cute and were a blast to create. If you try them let me know how it goes. 


Friday, July 27, 2012

How Pinterest-ing and Aloha Blog Hop

So over the last couple months I used/made a few pinterest finds that I would like to share with you today.

I have a ton of jewelry, I know I rarely wear any of it but I still have a ton. 
My bracelets always just get thrown around and one day I stumbled upon this treasure. 
A paper towel holder as a bracelet holder, brilliant. The best part was that when I moved I would
have this exact one in black and no where to go with it, because 
our house had 2, yes TWO, paper towel holders mounted under the upper cabinets.
I did this but left it black because it matched the color of our room, or at
least what it will be. 
bracelet holder

You have stinky towels or wash rags? I do did.
This how to tells you how to remove the mildew smell
and it actually works.
How to Remove Mildew Smell from Towels- Good  to know.

Vinegar and I have become BFF's over the past year. There 
are so many uses for it and we have like 2343 gallons at home that needs
use so I am always trying to find a way to use it up. To top that off our garden is producing 
like crazy and we are always washing our veggies. I read this article of 
cleaning and shining fruits so I decided to try it on my veggies. 
It actually works pretty good.
my mom does this-Cleaning fruit - fill sink with water, add 1 C. vinegar, mix.  Add all fruit and soak for 10 minutes.  Water will be dirty and fruit will sparkle with no wax or dirty film. Great for Berries too--keeps them from molding.  I do this with strawberries and they last for weeks!

I found this cake on pinterest for Carter's birthday party...
Cute scuba cake for swim party
Here is how it turned out... with my own alterations
such as adding a nose, ears, more hair and 
using icing for the eyes and mouth instead of candy.
Oh, and I also took the strap off the goggles, they
just placed and laid nicer.
and you see those cake pops above?
My mom made those but we got the instructions here..
Beach Ball Cake Pops

I have found many uses for many different things but this one is by far my 
favorite. I have stumbled upon another use for a 
painters drop cloth. Now, I will put the how-to on here
but I will not be putting the finished product on there because we
are using it at the wedding.....
Painters cloth painted and turned table cloth.
Drop Cloth painted stripes tutorial for curtains
That's right, I am using painters cloth at the wedding. There 
are actually 3 tables I am using them for. Mine turned out amazing.
I can't wait to see them on the tables. 

Well that is all I have for now.

We are also linking up with


For the details visit Local Sugar.


Friday, June 22, 2012

Pinteresting Things: Tried, Attempted and Will do Someday

Last weekend we hosted Father's Day at our house. I was looking for a good wine-y drink to 
serve and I stumbled upon Raspberry and Serrano Sangria. Yes, I said Serrano. Now as I read the 
recipe it said that we could omit the Serrano but I figured I would go with it and try it, 
turns out I LOVED IT! 
Now it also said that you could use honey instead of regular sugar so I did that to, mainly because for some reason I have an over abundance of honey. Try it, I think you will like it. OH, and the wine is found in the French section of wine. When the liquid is completely out of the pitcher let it sit for a little longer because the fruit will release more liquid and you will have more to drink.

get recipe here

Ok, so apparently, according to this "pin" (there is no link to the pin) if you put 4-5 drops of saline into
your old mascara bottle, insert your wand and ta-da... like new mascara. You are 
suppose to be able to do this 2-3 times before really having to buy new mascara.
Ya, this didn't work for me. It worked the first time but the second and third time it turned
out clumpier then what it was before I put the solution into it. 
MAKE MASCARA LAST 3X LONGER!! A typical mascara dries out before half of it is used.  When your favorite mascara starts getting dry, add 4-5 drops of saline solution or eyedrops to the bottle. Insert your wand and stir and TA-DA!!  Fresh mascara! This can be repeated 2 or 3 times until all you mascara is gone.

I hope to someday have an awesome patio to lounge on, with a swimming pool to enjoy.
For now I have one of those blue Intex pools, which work just fine and the 
patio is grassy in some spots and nothing but dirt in others. 
Once we have everything worked out, cleaned up and pretty I would 
like to make one of these for my patio....
It's an old cooler, pallet wood, a chain for the lid and a spicket to 
drain the water. The guy that made this was genius.
DIY cooler


I am also linking up with a "blog hop"
a great way to meet other bloggers, see their creative
ideas and read what they have to say.
I good way to meet new friends.
Just remember if they "follow" you
do the nice thing and stop in and follow them.


That's all I have for today. 
Happy Friday All!

Thursday, May 10, 2012

Adventures of Little Man and His Last Few Days of School

Carter is wrapping up his Kindergarten year and it's making this mom very sad. Through the past nine+ months he has learned so much. I never would have thought in a million years that Carter would be reading full sentences, counting by 2's, 5's and 10's, learning about the science of nature and applying it to real life. He has grown so much this school year that I don't know if I will be able to handle it. I was talking to my dad the other day, we were actually talking about the house that we will be living in. I told him that Tim and I would like to stay there for at least 10 years to save money and find land to build on. My dad's response was "in 10 years you are going to have a 16 year old".... I just wanted to cry. These past 5 years and 9 months went past in the blink of an eye I can only imagine how fast the next 10 will go.

Even though they don't have a graduation
the school still takes their picture in a 
cap and gown with the diplomas for us. 

Carter's school does not have a Kindergarten graduation. At first this made me sad because I think that is a highlight for some parents to watch their little ones turn the page to the next chapter in their life.... 1st grade it me is like the beginning of the end. To me it's like Carter will no longer be that toddler that needs help it is the beginning of independence and the end of the public hugs and kisses. I know 1st grade is a big deal to Carter, it is all he talks about. This mom is going to go cry in the corner now.... ok, maybe later. 

Carter has a full summer ahead of him. He has the trips with the sitter, play dates with the sitters brother, a few week long stays with his dad, fishing  (of course), swimming, moving, his mom (me) getting married, vacation bible school and the list just goes on. There is one thing he looks forward to the most and that is his 6th birthday that is coming up in July. I don't think he is going to want to go back to school come August.

OH, I almost forgot. This week was Teacher Appreciation week and I asked Carter what he wanted to get his teacher and he said flowers. Well I have this slight addiction to Pinterest and so I went and searched a teacher gift and found the perfect one with flowers. Carter and I painted the pot that it came in, put a $10 Target "thank you" gift card on it and took it to her yesterday... she loved it, and Carter and I are pretty proud of how it turned out as well....

See, cute right. I had Carter personalize it with his hand prints. 
He also wrote his name on the back of the pot in chalk but
since we knew that would wipe away he also printed his name 
in permanent marker on the red hand.
It's not in the picture but we also tied a piece of chalk to the stick
so his teacher would always have something to write on the pot with. 
This was a super easy project and would have been easier of I could have got the 
plant out of the pot before I painted it.


Wednesday, February 8, 2012

Valentine Tradition and Pinterest Finds...

Valentine's has gotten to commercialized to begin with so we are going to keep this holiday simple. Last year Tim and I decided to start a Valentine tradition. The tradition, we will make our own romantic dinner at home, pull out all the stops, use the nice stuff and go all out on the dinner. We mutually dislike crowds and we really don't like waiting to be seated at a restaurant and this year we are attempting to save money so our decision to make this a tradition was easy. Last years dinner consisted of steak, this amazing green bean new potato recipe, rice, heart shaped biscuits, wine (juice for the little one) and an amazing dessert. This year's dinner is still being contemplated by the the boys and I but I am sure what ever we decide is going to be delish as usual. 

As far as gifts we try to keep it simple as well. Last year I made Tim a 100 reasons why I Love You box. I had an old cigar box and put all 100 reason in it. I didn't decorate the box because I didn't want to draw attention to the box and have people snooping in it to see what was inside, he lived with his brother at the time and there were always visitors so you never knew. I also made him a resume, a what? I made him a resume to be his wife. I seen it online and thought it was cute so I went with it, I provided a cover letter, printed it on resume paper and all. I think that was his favorite gift, he still has it any way.

This year I am looking for more creative but cheap ways to show my love and here is what I found on pinterest. As soon as I decide which I will do I will document it and share but here are the choices I have narrowed it down to. 

For Carter's Teacher I am planning on doing a version of this..... found over at Creative Treasures

My plan is to use a fish bowl. I found I had a few (10) in storage 
so I washed one up and plan on using it in some fashion. 
I am going to either use this exact "Smartie" version 
or fill it with Sharpies and put..
"Because of you I'm a real Sharpie"

For Tim I may need some DIY ideas but this is what I have so far....

love this!
Love the sayings on the bottom cookies...

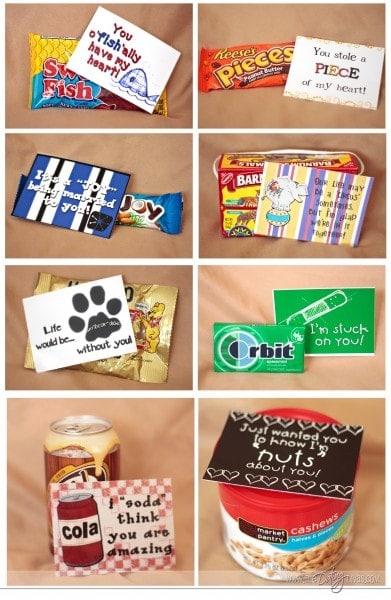
I thought I would make a snack basket for him and put these sayings
on all the snacks/drinks... cute right? or just Cheesy?

From PaperVine.....

Cute but along the same lines of that box I did last year, right?


That is all I got. Now for Carter I usually just get him a Valentine stuffed animal that never makes it very long in our house SO I think this year  I will just spend about $5 on a mini lego set and call it a day. Any ideas for a DIY gift I can make for the love of my life?


Thursday, January 19, 2012

If It Weren't For Pinterest

If it wasn't for pinterest I probably wouldn't know of some MUST HAVE shots that I would love for my photographer to capture. Check out the moments I have found....

Pinned Image
I could so see me doing this at the front of Holy Cross.
I mean they have the perfect stairs. 

Pinned Image
I think this is so cute... it's like he is saying 
"SCORE!"

Pinned Image
I have 5 brothers... I think this is possible.
They look like close siblings.

Pinned Image
You can just see the love.

Pinned Image
The picture on the right even took my breath away.

Pinned Image
Because Tim calls me Sunshine

That is all I have for now but they are a MUST HAVE for my album.

Thursday, January 5, 2012

Christmas Craft Project #3

Ok, this is my final Christmas Craft Project post. I forgot to post this last week and I am sure some of you were waiting to for this one. On December 20th I posted a blog about Christmas Craft Projects Past and it talked about and has pictures of some of my past handmade Christmas ornaments, all snowmen. I am revealing this years ornament today. 
......................................................DRUM ROLL PLEASE..................................................................
(baha, I hear the drunk grandma on National Lampoons Christmas Vacation doing the drum roll)


JOY TO THE WORLD.....

90 Beer Bottle caps....

30 Bottle Cap Snowmen...

So darn cute...

I had to wait until after Christmas to show these little guys off because I didn't want to give away this years idea. It is always a secret at to what recycled material I am using... Would you believe I already have the recycled stuff to make next years? I think I will wait to work on that after the wedding. 

Wednesday, December 28, 2011

Pinterest Craft's with Christi

Who's addicted to Pinterest.com? The girl I work with wasn't... until I got a hold of her, now she is addicted. She is so addicted that she found an idea on pinterest for a wedding gift, that was reasonable in price, but needed someone who could embroider to complete it. I told her I would do it, after all what she was wanting done was a very simple project. I actually finished it over my lunch hour, yep it was that easy.

Here is the link to what she was requesting.... http://pinterest.com/pin/31877109831998997/. Now I only went off looking at this picture and nothing else. I figured it couldn't be that hard. 

and here is my version of it....
Can you tell what it is? Read further and you will see. 
WHAT YOU NEED:
2 Pillow Cases (light colors are better)
Embroidery floss (2 colors of your choice)
1 needle
Embroidery Ring (I used a medium size one)
Sewing Marker or Pencil
Needle
Paper
Pencil
Permanent Marker
Ruler (I didn't have a ruler so I eye balled)

HOW TO:
First I took the paper and made a stencil, so to speak. I wrote on the paper "love you" and "love you too" until I liked how it looked in pencil. I then traced over the pencil with permanent marker. I put the piece of paper into the pillow case (at the closed end), making sure the sayings were going to be about 3 1/2" from the bottom of the pillow case, and with the sewing pencil I traced over the sayings. I then attached the ring to the pillow case, separated 3 strands of floss and threaded the needle. I then started the letters, I used a back stitch. When I started the second pillow case I laid it flat next to the finished one, like it would look on a bed, and I marked the spot where the next saying should start. I placed the 2nd stencil into the closed end of the pillow case and made sure the start of the lettering was going to match up where the lettering from the other pillow case ended. Once you are finished with the pillow cases you need to wash them to get rid of the markings you made. Here is my finished product..... (I did not wash them, the girl I work with is going to do that so you will see yellow on my finished product).


Ok... so this picture doesn't look like it lines up but I promise you it does. I was trying to get my pictures to lay horizontally but they wouldn't so I just put them in a collage so see how they would meet if my pictures were pillowcases... like I said.. not a perfect picture but it will do. The left pillow case is in green writing and the right one is in brown writing. See first picture to kind of see the concept.

Wednesday, December 21, 2011

Pinteresting News...

So I was thinking I have never checked my "stats" to show how many people check my blog and where the people are coming from when they are stopping by. I have found a majority of it comes from facebook, which is a given since I do put links on there often BUT I have found out that someone actually "pinned" one of my Friday Fall Recipes. Oh happy day!!!... I have a pin on pinterest (grinning from ear to ear). If you would like to see it for yourself click this link..... http://pinterest.com/pin/132574782750314824/ . I know this math doesn't add up but my blog has had 3 page views from pinterest AND 4 re-pins on pinterest. Now that is pinteresting news!

Thank you my secret pinner :-)

Tuesday, December 20, 2011

Christmas Craft Projects Past

Every year I make ornaments, I try to make them out of recycled material (sometime that doesn't work out) BUT aside from the first two years I have always made snowmen. I am going to share with you some of the past snowmen and next week you can stop back in for the 2011 addition. When I worked at the courthouse I made one for almost everyone in the office, which there were at least 60 people. Since I have been working at B&A  I am not making 90+ ornaments but I am still in the 30's. I make them for every family member, friend and anyone else I can think of that would enjoy a hand made ornament.

This is the ornament that started them all. 
I know it's not a snowman but this was the first 
year of making ornaments. I believe it was 1999.
The following year I made an ugly elf and decided after
all that I was going to make a theme to my ornaments.

I started making these ornaments because the Zimmermann's had a tradition, any woman in the family that no longer lived at home had to make a homemade ornament and when we gathered on Christmas we would exchange them. It was fun to see what everyone came up with, but of course I always had snowmen. The aunts, who's kids were mostly grown when I started making them, started forgetting to make them or they didn't have enough time until about 4 years ago everyone quit. Well, I still make my ornaments and spread my snowman cheer.

Here are my ornaments from Christmas Past:

The ball to the left was my first snowman ornament. After making that one I had the 
idea to same my light bulbs. It took a couple (5+) years to save all the bulbs I 
needed to make the number of ornaments that I needed I was determined to have a 
light bulb snowman. He turned out pretty cute.
After Carter started eating baby food I was looking at the abundance
of jars that I had and immediately thought SNOWMAN!!!

The above 2 snowmen were kits that I bought. I was a a loss these two years
and these kits were pretty cheap so I went with it. They aren't my favorite but they are still cute.

I have to say these two are my favorite. It took a lot of work to bend the spoon and
 tip of the knife but once all 90+ were complete they turned out super cute.
You probably wondering where I got all the spoons and knives. Well, I had attended an
auction that had 100's of forks, spoons & knives and I instantly thought if I could get them
for a dollar I would use them for ornaments. I got them for that $1.00 and made super
 cute ornaments out of them. 

I have also made these ornaments out of tin cans and the tin can lids. That was possible by using the edge-less can opener from Pampered Chef. By using that can opener it dulled the edges of the can and lid and I didn't have to worry about the can or lid cutting anyone. I have also recently used crushed beer soda cans. They too turned out super cute. My addiction for making homemade ornaments and giving them away has spilled over to my bonus-sister-in-law, Trish. She has started making homemade ornaments to give away and below is a photo of her first homemade ornament.  


I hope this has inspired you to make your own ornament and maybe you have gone away with some super cute ideas. Merry Christmas Everyone!!!

Tuesday, December 13, 2011

Christmas Craft Project #2

This year I decided that I was going attempt to make some of my Christmas presents. My first project was the M&M jar for Carter's teacher, which turned out adorable, you can check out Pinterest Crafts with Christi and read all about it. The Christmas Craft Project I am featuring today is a tea bag wreath, I found on a blog over at Kojo Designs. My boss loves different flavor teas so I thought this would be a great idea.

For directions to make the wreath please click here..... Kojo Designs and get all the details. 

Here is what mine looks like.....

Now I know that the directions said to use colors that would look good in your kitchen but I made this wreath for my male boss and it is probably going to hang in his office so I just used Christmas colors. I also know you are thinking that the bags on the wreath do not look like tea bags... and they don't. The reason for that is, well I don't have a reason. I purchased this tea and when I went open the box to put the bags on the wreath 2 of the boxes DID NOT have individual wrapped bags and the 2 variety pack boxes that I bought had these bags with 3 tea bags in each. I went on a head and put those on the wreath, even though this isn't want I wanted it to look like. I had some clothes pins at the top of the wreath that were un-used and my thought was WHAT THE HELL AM I GOING TO DO NOW!!....I was slightly aggravated with it, then remembered I had this huge bow I could use to cover the unused cloths pins. I think all in all it turned out cute, and the other 2 boxes of tea bags... well I am just going to give him wrapped.

Thursday, December 8, 2011

Pinterest Craft's with Christi

Pinterest is the most amazing place to find DIY crafts. I am making about four Christmas presents and I found all of them on Pinterest. I will post them as I get them completed. The first one I made was for Carter's teacher. I found an M&M jar at Mommy's Kitchen, the jar of M&M's also had the cutest appreciation poem that I thought was perfect. The jar at Mommy's Kitchen  was adorable but I wanted something that was monogrammed and fun so I spiced it up a little. 

What I used:
Glass Jar with screw on lid
Black Acrylic Paint
Paint Brush
Stencil
Ribbon w/ wire
2 Bag's of M&M's (your choice)
1 Sheet of White Paper
1 Sheet of Construction Paper (your choice on color)
Scissors
tape
dry erase marker
paper plate


To Prepare: 

I washed the jar and dried it well. I found the letter on my stencil patterns that I wanted, cut it out, measured and centered the letter on the jar then taped it down so it wouldn't move. I took a dry erase marker and outlined the letter, then peeled the stencil off the jar. I put about a dime size of black paint onto a paper plate and then started painting the letter on, the marker will disappear as you paint over it. 


After you take the stencil off the jar you have to be careful to not rub the marker because it wipes off the jar very easily.


After you have the jar painted you let it dry. Now, Carter's teacher's last name starts with an "S" but she is not married and she could possibly change her name if the future so I didn't do the next step for if she does get married the "S" will be easy to wash off. If I wanted that letter to be permanent I would have place the bottom  portion of the jar in a cold oven, turned it on 350 degrees and baked it for about 30 minutes, then shut the oven off and allow it to cool for another 30 minutes or so before taking it out of the oven. Baking the paint on helps the paint bond better with the slick surface. 

It's pretty simple.


I re-washed the jar and dried it good before pouring the 2 large bags of plain M&M's into it. I then took the ribbon and cut them in to 5-6 inch strips. I tied them all the way across the handle that is on the lid and then I took a thick marker (I think I used a sharpie) and twisted the ribbon around the it making a bunch of curly-ques.
Isn't it cute. I think this is something she wouldn't mind
sitting on her desk. Carter says she gives out M&M's 
some times. I hope she likes it. Teachers, please leave thoughts.

I went to Mommy's Kitchen and copied and pasted the poem to my word program, tailored (font, size, color, etc.) and printed it. I cute it out with scalloped scrap-booking scissors and glued it to a piece of red construction paper where I cut 1.5 inches from the edge of the poem paper another scalloped edge. I punched a hole on the corner of the paper and tied the poem to the handle of the jar.

This was a pretty easy project and didn't really take much time at all. Thank you Mommy's Kitchen for your wonderful blog and for having it "pinned" on pinterest.com